Fullscreen Video Background Control for Xamarin.Forms
How to play video as page background, like Spotify, using Xamarin.Forms with Android and iOS Custom Renderer
One of the cool trend on mobile UI I’ve seen a lot is using video as View background. You can see it on some big mobile app products like Tumblr, Spotify, and Vine. As you can see, they have this cool Home View with sign in and sing up button with video playing in background. This feature is so cool and can make your app look more professional.
This time, I’ll show you how to implement it in Xamarin.Forms app. All we need is to implement two custom renderers for Android and iOS each.
🏆 Best Mobile Article of March 2017 : Second Prize at CodeProject.
Creating Video View Control for Xamarin.Forms
Let’s create a new Xamarin.Forms PCL project first and name it BackgroundVideo. Now let’s head to the PCL library and create a new class called Video inherited from Xamarin.Forms.View.
using System;
using Xamarin.Forms;

namespace BackgroundVideo.Controls
{
  public class Video : View
  {
  }
}
For the sake of the tutorial, we’re going to make this control with simple requirements.
We need a bindable property to point which video to be displayed. I’m going to call it Source property. It’s a string to locate which video file to be played. On iOS, Source property is relative to Resources directory as for Android, it is relative to Assets directory.
public static readonly BindableProperty SourceProperty =
    BindableProperty.Create(
    nameof(Source),
    typeof(string),
    typeof(Video),
    string.Empty,
    BindingMode.TwoWay);

public string Source
{
    get { return (string)GetValue(SourceProperty); }
    set { SetValue(SourceProperty, value); }
}
Next thing we need is a boolean to define if we want the video in loop or not. Let’s call this property Loop. By default, I set this value as true so when you set a video Source property, it would be looped by default.
Finally, we’re going to need a callback fired when video is finished. For simplicity, I use Action class called OnFinishedPlaying. You can modify it to event or anything you comfortable with.
public static readonly BindableProperty LoopProperty =
    BindableProperty.Create(
    nameof(Loop),
    typeof(bool),
    typeof(Video),
    true,
    BindingMode.TwoWay);

public bool Loop
{
    get { return (bool)GetValue(LoopProperty); }
    set { SetValue(LoopProperty, value); }
}

public Action OnFinishedPlaying { get; set; }
After we created this class, next thing to do is to implement custom renderers for both iOS and Android.
Video View Control iOS Custom Renderer
First thing to do is to create a custom renderer class called VideoRenderer inherited from ViewRenderer<Video, UIView>. The idea is to use iOS native video player with the help of MPMoviePlayerController class and set its native control to our Video custom view. Also we’re going to need an NSObject to listen the event from video player wether it is ended or not.
using System;
using System.IO;
using BackgroundVideo.Controls;
using BackgroundVideo.iOS.Renderers;
using Foundation;
using MediaPlayer;
using UIKit;
using Xamarin.Forms;
using Xamarin.Forms.Platform.iOS;

[assembly: ExportRenderer(typeof(Video), typeof(VideoRenderer))]
namespace BackgroundVideo.iOS.Renderers
{
  public class VideoRenderer : ViewRenderer<Video, UIView>
  {
    MPMoviePlayerController videoPlayer;
    NSObject notification = null;
  }
}
To start iOS video player, we need to check wether the video from Source property exists in Resources budnle or not. If it doesn’t exist, we’ll display an empty view.
If the video file exists, we need to create MPMoviePlayerController and parse the location of the video file as NSUrl. To make our custom control clear, without border or anything, we need to set ControlStyle to MPMovieControlStyle.None and background color to UIColor.Clear.
Also, we probably will have one video file for any resolution. You don’t want it to look stretched on some device, right? To make the video resolution looks consistent, we need to set video player ScalingMode to MPMovieScalingMode.AspectFill.
We also have this Loop property to define wether the video playing will be looped or not. To set it to loop, we need to change video player RepeatMode to MPMovieRepeatMode.One. Otherwise, set it to MPMovieRepeatMode.None.
Finally, to make video player play the file, we call PrepareToPlay() function. To display the video to our custom control, we need to use SetNativeControl() function.
void InitVideoPlayer()
{
    var path = Path.Combine(NSBundle.MainBundle.BundlePath, Element.Source);

    if (!NSFileManager.DefaultManager.FileExists(path))
    {
      Console.WriteLine("Video not exist");
      videoPlayer = new MPMoviePlayerController();
      videoPlayer.ControlStyle = MPMovieControlStyle.None;
      videoPlayer.ScalingMode = MPMovieScalingMode.AspectFill;
      videoPlayer.RepeatMode = MPMovieRepeatMode.One;
      videoPlayer.View.BackgroundColor = UIColor.Clear;
      SetNativeControl(videoPlayer.View);
      return;
    }

    // Load the video from the app bundle.
    NSUrl videoURL = new NSUrl(path, false);

    // Create and configure the movie player.
    videoPlayer = new MPMoviePlayerController(videoURL);

    videoPlayer.ControlStyle = MPMovieControlStyle.None;
    videoPlayer.ScalingMode = MPMovieScalingMode.AspectFill;
    videoPlayer.RepeatMode = Element.Loop ? MPMovieRepeatMode.One : MPMovieRepeatMode.None;
    videoPlayer.View.BackgroundColor = UIColor.Clear;
    foreach (UIView subView in videoPlayer.View.Subviews)
    {
      subView.BackgroundColor = UIColor.Clear;
    }

    videoPlayer.PrepareToPlay();
    SetNativeControl(videoPlayer.View);
}
The rest of the code is to override OnElementChanged and OnElementPropertyChanged function so it can be functionally working from Xamarin.Forms project. Under OnElementChanged, we need to listen to video player playback finish event and invoke OnFinishedPlaying action. The following snippet is the simplest code necessary to make it work.
protected override void OnElementChanged(ElementChangedEventArgs<Video> e)
{
    base.OnElementChanged(e);

    if (Control == null)
    {
      InitVideoPlayer();
    }
    if (e.OldElement != null)
    {
      // Unsubscribe
      notification?.Dispose();
    }
    if (e.NewElement != null)
    {
      // Subscribe
      notification = MPMoviePlayerController.Notifications.ObservePlaybackDidFinish((sender, args) =>
      {
        /* Access strongly typed args */
        Console.WriteLine("Notification: {0}", args.Notification);
        Console.WriteLine("FinishReason: {0}", args.FinishReason);

        Element?.OnFinishedPlaying?.Invoke();
      });
    }
}

protected override void OnElementPropertyChanged(object sender, System.ComponentModel.PropertyChangedEventArgs e)
{
    base.OnElementPropertyChanged(sender, e);
    if (Element == null || Control == null)
      return;

    if (e.PropertyName == Video.SourceProperty.PropertyName)
    {
      InitVideoPlayer();
    }
    else if (e.PropertyName == Video.LoopProperty.PropertyName)
    {
      var liveImage = Element as Video;
      if (videoPlayer != null)
        videoPlayer.RepeatMode = Element.Loop ? MPMovieRepeatMode.One : MPMovieRepeatMode.None;
    }
}
Now that iOS implementation is completed, let’s head to our Android project.
Video View Custom Renderer for Android
Create a new custom renderer on Android project and let’s name it VideoRenderer, too. We’ll inherit this renderer with ViewRenderer<Video, FrameLayout>, meaning it will be displayed as FrameLayout in native Android control.
One thing that made Android implementation a bit complicated is that we need two kind of views if you want to cover old Android versions. If you just want to cover modern Android OS from Ice Cream Sandwich or more, you can just focus on TextureView implementation, if not you’ll also need to implement it using VideoView.
Please note that VideoView implementation here is not optimal. Maybe you’ll notice some flickering. That’s why I add view called _placeholder. This is just an empty view. It’ll be displayed when no video playing or when in video source changed transition. If the video file ready to play and display, _placeholder will be hidden.
using System;
using Android.Graphics;
using Android.Graphics.Drawables;
using Android.Media;
using Android.OS;
using Android.Runtime;
using Android.Views;
using Android.Widget;
using BackgroundVideo.Controls;
using BackgroundVideo.Droid.Renderers;
using Xamarin.Forms;
using Xamarin.Forms.Platform.Android;

[assembly: ExportRenderer(typeof(Video), typeof(VideoRenderer))]
namespace BackgroundVideo.Droid.Renderers
{
  public class VideoRenderer : ViewRenderer<Video, FrameLayout>,
                 TextureView.ISurfaceTextureListener,
                 ISurfaceHolderCallback
  {
    private bool _isCompletionSubscribed = false;

    private FrameLayout _mainFrameLayout = null;

    private Android.Views.View _mainVideoView = null;
    private Android.Views.View _placeholder = null;

  }
}
Now before we thing about what video container to use, we need to implement the video player itself. Android already provide us with their MediaPlayer class. We’ll need to use this object and make sure it only created once. We can reuse the same object if we change the video source.
We need to set Completion event to implement our OnFinishedPlaying callback. We also need to set Looping property to our custom Loop property.
There is one thing that different from our iOS implementation, there is no easy property set to display video resolution as aspect fill! That means we need to implement our own method into custom function called AdjustTextureViewAspect(). This function will be called on VideoSizeChanged callback. We’ll talk about this implementation later.
private MediaPlayer _videoPlayer = null;
internal MediaPlayer VideoPlayer
{
  get
  {
    if (_videoPlayer == null)
    {
      _videoPlayer = new MediaPlayer();

      if (!_isCompletionSubscribed)
      {
        _isCompletionSubscribed = true;
        _videoPlayer.Completion += Player_Completion;
      }

      _videoPlayer.VideoSizeChanged += (sender, args) =>
      {
        AdjustTextureViewAspect(args.Width, args.Height);
      };

      _videoPlayer.Info += (sender, args) =>
      {
        Console.WriteLine("onInfo what={0}, extra={1}", args.What, args.Extra);
        if (args.What == MediaInfo.VideoRenderingStart)
        {
          Console.WriteLine("[MEDIA_INFO_VIDEO_RENDERING_START] placeholder GONE");
          _placeholder.Visibility = ViewStates.Gone;
        }
      };

      _videoPlayer.Prepared += (sender, args) =>
      {
        _mainVideoView.Visibility = ViewStates.Visible;
        _videoPlayer.Start();
        if (Element != null)
          _videoPlayer.Looping = Element.Loop;
      };
    }

    return _videoPlayer;
  }
}

private void Player_Completion(object sender, EventArgs e)
{
  Element?.OnFinishedPlaying?.Invoke();
}
Now that we have our video player object, next thing is to create function that play video from Source property. Please remember that video file on Android need to be stored under Assets directory. We can open this file by using Assets.OpenFd(fullPath) function.
If the file doesn’t exist, it’ll throw Java.IO.IOException. That means we don’t need to display anything on our video container.
If the file exists, we just need to reset our video player, then set data source based on previous step. We can’t just play the video directly, so we need to prepare it first. When preparation complete, it’ll trigger Prepared event and display the video to one of our implemented video view from previous step.
private void PlayVideo(string fullPath)
{
  Android.Content.Res.AssetFileDescriptor afd = null;

  try
  {
    afd = Context.Assets.OpenFd(fullPath);
  }
  catch (Java.IO.IOException ex)
  {
    Console.WriteLine("Play video: " + Element.Source + " not found because " + ex);
    _mainVideoView.Visibility = ViewStates.Gone;
  }
  catch (Exception ex)
  {
    Console.WriteLine("Error openfd: " + ex);
    _mainVideoView.Visibility = ViewStates.Gone;
  }

  if (afd != null)
  {
    Console.WriteLine("Lenght " + afd.Length);
    VideoPlayer.Reset();
    VideoPlayer.SetDataSource(afd.FileDescriptor, afd.StartOffset, afd.Length);
    VideoPlayer.PrepareAsync();
  }
}
As previously mentioned, Android doesn’t provide us easy property to scale our video to aspect fill. You know it yourself that Android devices have so many screen resolution so keep the video like it is is not an option. We need to scale it properly so it won’t look stretched.
Good news is, we can do that if we use TextureView. Bad news is for now I don’t know how to implement it with VideoView. But it’s better than nothing right?
The idea to make video scale properly is to use matrix to scale the content of TextureView. It is scaled up or down based on video size and view size. Then, after it’s scaled, it is positioned at the center of the view.
private void AdjustTextureViewAspect(int videoWidth, int videoHeight)
{
  if (!(_mainVideoView is TextureView))
    return;

  if (Control == null)
    return;

  var control = Control;

  var textureView = _mainVideoView as TextureView;

  var controlWidth = control.Width;
  var controlHeight = control.Height;
  var aspectRatio = (double)videoHeight / videoWidth;

  int newWidth, newHeight;

  if (controlHeight <= (int)(controlWidth * aspectRatio))
  {
    // limited by narrow width; restrict height
    newWidth = controlWidth;
    newHeight = (int)(controlWidth * aspectRatio);
  }
  else
  {
    // limited by short height; restrict width
    newWidth = (int)(controlHeight / aspectRatio);
    newHeight = controlHeight;
  }

  int xoff = (controlWidth - newWidth) / 2;
  int yoff = (controlHeight - newHeight) / 2;

  Console.WriteLine("video=" + videoWidth + "x" + videoHeight +
      " view=" + controlWidth + "x" + controlHeight +
      " newView=" + newWidth + "x" + newHeight +
      " off=" + xoff + "," + yoff);

  var txform = new Matrix();
  textureView.GetTransform(txform);
  txform.SetScale((float)newWidth / controlWidth, (float)newHeight / controlHeight);
  txform.PostTranslate(xoff, yoff);
  textureView.SetTransform(txform);
}
As mentioned earlier, if we want to support a wide range of Android OS, we need to implement it into TextureView and VideoView. This will be implemented under OnElementChanged function. Both implementation have some same properties. We will make their Background color to transparent and layout parameters to match parent. This way it won’t have any color to display when there is no video, and it’ll fill entire container.
Following snippet is how to implement it on our Video custom renderer. You see it’s similar with our iOS implementation, except for container creation and video playing.
protected override void OnElementChanged(ElementChangedEventArgs<Video> e)
{
  base.OnElementChanged(e);

  if (Control == null)
  {
    _mainFrameLayout = new FrameLayout(Context);

    _placeholder = new Android.Views.View(Context)
    {
      Background = new ColorDrawable(Xamarin.Forms.Color.Transparent.ToAndroid()),
      LayoutParameters = new LayoutParams(
        ViewGroup.LayoutParams.MatchParent,
        ViewGroup.LayoutParams.MatchParent),
    };

    if (Build.VERSION.SdkInt < BuildVersionCodes.IceCreamSandwich)
    {
      Console.WriteLine("Using VideoView");

      var videoView = new VideoView(Context)
      {
        Background = new ColorDrawable(Xamarin.Forms.Color.Transparent.ToAndroid()),
        Visibility = ViewStates.Gone,
        LayoutParameters = new LayoutParams(
          ViewGroup.LayoutParams.MatchParent,
          ViewGroup.LayoutParams.MatchParent),
      };

      ISurfaceHolder holder = videoView.Holder;
      if (Build.VERSION.SdkInt < BuildVersionCodes.Honeycomb)
      {
        holder.SetType(SurfaceType.PushBuffers);
      }
      holder.AddCallback(this);

      _mainVideoView = videoView;
    }
    else
    {
      Console.WriteLine("Using TextureView");

      var textureView = new TextureView(Context)
      {
        Background = new ColorDrawable(Xamarin.Forms.Color.Transparent.ToAndroid()),
        Visibility = ViewStates.Gone,
        LayoutParameters = new LayoutParams(
          ViewGroup.LayoutParams.MatchParent,
          ViewGroup.LayoutParams.MatchParent),
      };

      textureView.SurfaceTextureListener = this;

      _mainVideoView = textureView;
    }

    _mainFrameLayout.AddView(_mainVideoView);
    _mainFrameLayout.AddView(_placeholder);

    SetNativeControl(_mainFrameLayout);

    PlayVideo(Element.Source);
  }
  if (e.OldElement != null)
  {
    // Unsubscribe
    if (_videoPlayer != null && _isCompletionSubscribed)
    {
      _isCompletionSubscribed = false;
      _videoPlayer.Completion -= Player_Completion;
    }
  }
  if (e.NewElement != null)
  {
    // Subscribe
    if (_videoPlayer != null && !_isCompletionSubscribed)
    {
      _isCompletionSubscribed = true;
      _videoPlayer.Completion += Player_Completion;
    }
  }
}

protected override void OnElementPropertyChanged(object sender, System.ComponentModel.PropertyChangedEventArgs e)
{
  base.OnElementPropertyChanged(sender, e);
  if (Element == null || Control == null)
    return;

  if (e.PropertyName == Video.SourceProperty.PropertyName)
  {
    Console.WriteLine("Play video: " + Element.Source);
    PlayVideo(Element.Source);
  }
  else if (e.PropertyName == Video.LoopProperty.PropertyName)
  {
    Console.WriteLine("Is Looping? " + Element.Loop);
    VideoPlayer.Looping = Element.Loop;
  }
}
Since we’re using TextureView and VideoView, there is some function from interfaces need to be implemented. One of them is to remove video when texture or surface is destroyed. To do that, we’re going to need to set _placeholder visibility to visible.
private void RemoveVideo()
{
  _placeholder.Visibility = ViewStates.Visible;
}
When using TextureView, we need to implement TextureView.ISurfaceTextureListener interface. We set video player’s surface when texture available and hide it when texture destroyed. Following snippet shows you how to implement it.
#region Surface Texture Listener

public void OnSurfaceTextureAvailable(SurfaceTexture surface, int width, int height)
{
  Console.WriteLine("Surface.TextureAvailable");
  VideoPlayer.SetSurface(new Surface(surface));
}

public bool OnSurfaceTextureDestroyed(SurfaceTexture surface)
{
  Console.WriteLine("Surface.TextureDestroyed");
  RemoveVideo();
  return false;
}

public void OnSurfaceTextureSizeChanged(SurfaceTexture surface, int width, int height)
{
  Console.WriteLine("Surface.TextureSizeChanged");
}

public void OnSurfaceTextureUpdated(SurfaceTexture surface)
{
  Console.WriteLine("Surface.TextureUpdated");
}

#endregion
When using VideoView, we need to implement ISurfaceHolderCallback interface. Similar with TextureView, we set video player’s display when surface created and hide it when surface destroyed. The complete implementation of this interface can be see on following snippet.
#region Surface Holder Callback

public void SurfaceChanged(ISurfaceHolder holder, [GeneratedEnum] Format format, int width, int height)
{
  Console.WriteLine("Surface.Changed");
}

public void SurfaceCreated(ISurfaceHolder holder)
{
  Console.WriteLine("Surface.Created");
  VideoPlayer.SetDisplay(holder);
}

public void SurfaceDestroyed(ISurfaceHolder holder)
{
  Console.WriteLine("Surface.Destroyed");
  RemoveVideo();
}

#endregion
That’s all we need for Android. Now that we all have everything needed, we can test this control to Xamarin.Forms Page.
Testing to Xamarin.Forms Page
Before we create a test page, I recommend you to prepare your own video file. It is recommended as vertical video so a lot of space won’t be wasted.
But, if you don’t have any video to test, don’t worry. You can download free videos to use from Coverr. They don’t have any vertical videos, we can still use it. You can either crop it into vertical video or you can just use it as it is since we already handle scaling to aspect fill on our code.
So use any video you like. I recommend any file as long as it’s mp4 video with h264 encoding. In this tutorial, I use video from Coverr called Orchestra. You can download it from here.
NOTE: For some Android and iOS devices, especially the old products, they probably can’t play some mp4 files. This is mostly caused by not-supported baseline profile. To fix that, you can re-encode the video using a tool like
ffmpegand change its baseline profile based on your preferences. See following table to check baseline profile compatibility with iOS. See Supported Media Formats from official Android guide, too.
| Profile | Level | Devices | Options |
|---|---|---|---|
| Baseline | 3.0 | All devices | -profile:v baseline -level 3.0 |
| Baseline | 3.1 | iPhone 3G and later, iPod touch 2nd generation and later | -profile:v baseline -level 3.1 |
| Main | 3.1 | iPad (all versions), Apple TV 2 and later, iPhone 4 and later | -profile:v main -level 3.1 |
| Main | 4.0 | Apple TV 3 and later, iPad 2 and later, iPhone 4s and later | -profile:v main -level 4.0 |
| High | 4.0 | Apple TV 3 and later, iPad 2 and later, iPhone 4s and later | -profile:v high -level 4.0 |
| High | 4.1 | iPad 2 and later, iPhone 4s and later, iPhone 5c and later | -profile:v high -level 4.1 |
| High | 4.2 | iPad Air and later, iPhone 5s and later | -profile:v high -level 4.2 |
After you get your video file, place it to the folders for each OS. On Android, you should put it under Assets directory. On iOS, you should put it under Resources directory. For this tutorial I put the file under Assets/Videos on Android and Resources/Videos on iOS.
Once you put them all to correct folder, we need to create our Page on Xamarin.Forms PCL project.
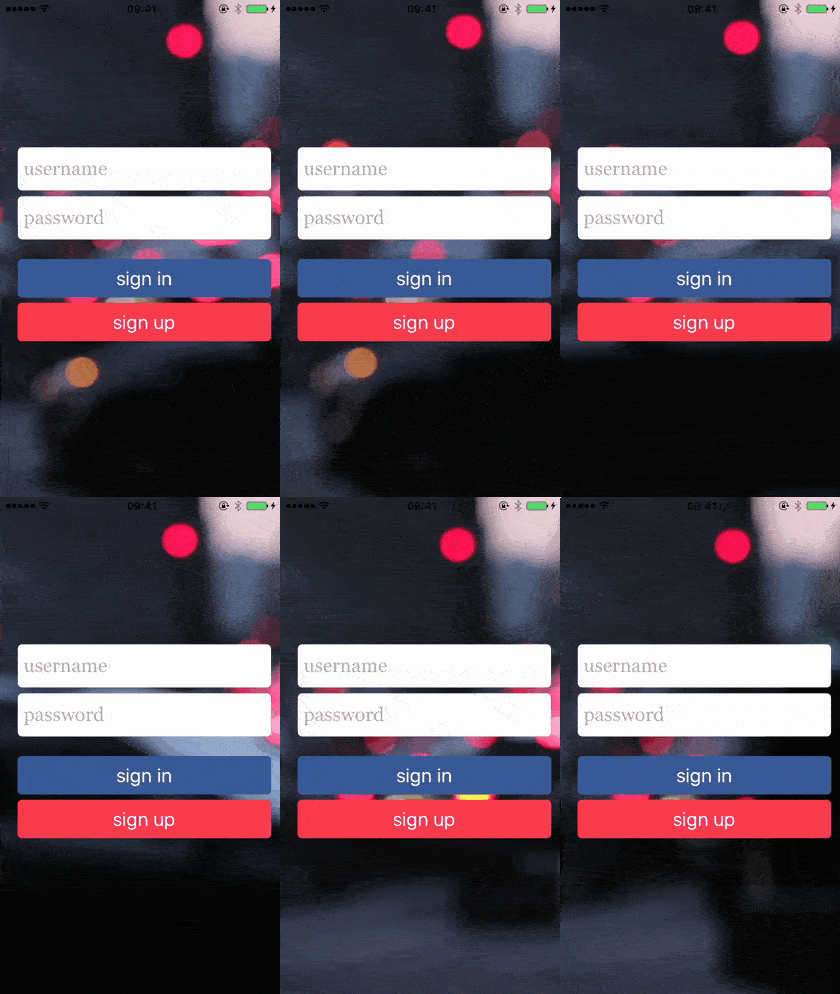
This is a simple page with smallest components. We’ll create a Home Page, with video background, two text boxes for username and password, and to buttons for sign in and sign up. There is no logic in this page, I just want to show you how to make a beautiful home page.
For better controls placement, I use Grid as container. See following snippet for the complete XAML.
<?xml version="1.0" encoding="utf-8"?>
<ContentPage xmlns="http://xamarin.com/schemas/2014/forms"
    xmlns:x="http://schemas.microsoft.com/winfx/2009/xaml"
    xmlns:local="clr-namespace:BackgroundVideo"
    xmlns:controls="clr-namespace:BackgroundVideo.Controls"
    x:Class="BackgroundVideo.BackgroundVideoPage">
  <Grid Padding="0" RowSpacing="0" ColumnSpacing="0">
    <controls:Video x:Name="video" Source="Videos/Orchestra.mp4" Loop="true"
      HorizontalOptions="Fill" VerticalOptions="Fill" />
    <StackLayout VerticalOptions="Center" HorizontalOptions="FillAndExpand" Padding="20,10,10,20">
      <Entry Placeholder="username" FontSize="Large"
        FontFamily="Georgia" HeightRequest="50">
        <Entry.PlaceholderColor>
          <OnPlatform x:TypeArguments="Color" Android="Silver" />
        </Entry.PlaceholderColor>
        <Entry.TextColor>
          <OnPlatform x:TypeArguments="Color" Android="White" />
        </Entry.TextColor>
      </Entry>
      <Entry Placeholder="password" FontSize="Large"
        FontFamily="Georgia" HeightRequest="50" IsPassword="true">
        <Entry.PlaceholderColor>
          <OnPlatform x:TypeArguments="Color" Android="Silver" />
        </Entry.PlaceholderColor>
        <Entry.TextColor>
          <OnPlatform x:TypeArguments="Color" Android="White" />
        </Entry.TextColor>
      </Entry>
      <BoxView Color="Transparent" HeightRequest="10" />
      <Button Text="sign in" BackgroundColor="#3b5998" TextColor="#ffffff"
        FontSize="Large" />
      <Button Text="sign up" BackgroundColor="#fa3c4c" TextColor="#ffffff"
        FontSize="Large" />
    </StackLayout>
  </Grid>
</ContentPage>
That’s it. If you don’t want the video to be looped, just change its Loop property. If you want to do something when video ended, just set OnFinishedPlaying from C# code. Now let’s see how it runs.
See it in Action
If you set everything correctly, The following figure is how it run on iOS device or emulator. As you can see, there are two text boxes and two buttons. The video is playing as the page background smoothly.

Similar with iOS version, the following animated gif image shows how it looks on Android device or emulator. See that text box style difference from iOS version. But let’s care about it later, the point is video background consistently work just like iOS.

All you need to do the rest is to make styling more consistent through any platforms.
Summary
Once again, all I can say is you can make any cross platform control you want by using Custom Renderer. As long as you understand how to code in native language (well, you can Google it though), you can create anything.
As for performance, I believe I said it earlier, you probably see some flickering on old Android devices. For now I don’t have any idea to optimize it.
If you have any idea and suggestion, feel free to leave a comment below.
You can download completed project on GitHub.
References
- Encode/H.264 – FFmpeg
- Play video in background (like spotify) using xamarin forms and android renderer — Xamarin Community Forums
- How to avoid flickering and black screen issues when using VideoView? | Bright Inventions
- iOS Video Backgrounds – Kai Schaller – Medium

