Xamarin Mobile Apps Continuous Integration and Delivery with Jenkins and HockeyApp
Building and distribution automation for Xamarin apps to make your life easier and simpler
Laziness is probably the middle name of every programmer, especially when it comes to doing repetitive (usually) boring stuff, again and again. One of them is building app from latest source code.
Traditionally, we commit our work, pull our colleague’s code, merge them, build the binary file, and send it to testers. Not sure how many times we do that stuff every day.
Luckily, there is always a solution for that kind of repetitive task, by using Continuous Integration (CI) and Continuous Delivery (CD).
For CI, we’re going to use Jenkins. For those who don’t know what Jenkins is, just imagine yourself as Batman. Batman has butler named Alfred. Alfred usually do boring stuff like preparing meals, shirt, and scheduling for Batman. So Jenkins is like Alfred for programmer (look at official Jenkins logo, didn’t he look like Alfred?). It will do any repetitive task you assigned. You just need to worry about the code, the building steps will be handled by Jenkins, automatically.
As for CD, we’re using HockeyApp from Microsoft. What so great about it is it supports both iOS and Android apps. HockeyApp responsibility is to deliver our mobile apps to testers. For free user, you can use up to 10 apps.
🏆 Best Mobile Article of May 2017 : Second Prize at CodeProject.
Environment
Before we begin, I assume you’re using a macOS machine. You can use any OS, but to build iOS file, you’ll need a macOS machine. If you’re not on macOS, you can still follow this tutorial. But you need to figure out some steps yourself if it doesn’t work.
Xamarin Studio or Visual Studio for Mac must be installed. If not, you can download and install it from here.
For the purpose of this tutorial, I use a newly generated Xamarin.Forms project from Visual Studio for Mac. I name it BlogToApp and can be found from https://github.com/JunianNet/BlogToApp.Forms. The file structure usually look like this:
.
├── BlogToApp
│   └── BlogToApp.csproj
├── BlogToApp.sln
├── Droid
│   └── BlogToApp.Droid.csproj
└── iOS
    └── BlogToApp.iOS.csproj
As for solution structure, it’ll look like this:
.
└── BlogToApp
    ├── BlogToApp
    ├── BlogToApp.Droid
    └── BlogToApp.iOS
Please note that it’s important to understand the difference between folder structure and solution structure before continue to the next step.
Installing Jenkins
I personally prefer to install Jenkins from Homebrew. It’s simple and straightforward. You can just type this on your Terminal:
brew install jenkins
Please note that by the time this tutorial is written, Jenkins version is 2.62. So if some steps you follow doesn’t work, it probably incompatible with your installed Jenkins version.
After it’s installed, you can start it as daemon and make it running every time you logged in on your machine by typing this command:
brew services start jenkins
To test if it’s already installed and running, open your web browser and visit http://127.0.0.1:8080. On the first run, it usually ask initial admin password which you can find it in ~/.jenkins/secrets/initialAdminPassword. After that, let it install suggested plugins. Then just follow installation instruction until Jenkins is ready.
To make it work with Xamarin and HockeyApp, we need to install additional plugins. To do that, open http://127.0.0.1:8080/pluginManager/available on your web browser. Find following plugins:
- HockeyApp Plugin - This plugin allows you to upload new versions of your iOS (.ipa), MacOS (.app), and Android (.apk) applications to hockeyapp.net.
- Environment Injector Plugin - (Optional) This plugin can be used to set environment variables at the job and build level.
Select those plugins and click Install without restart. Wait until finished, then continue to create a build job step.
Creating A Build Job
Create a new job by opening http://127.0.0.1:8080/newJob. Name your project based on your preference and select Freestyle project. Click OK then you’ll see job configuration.
To make this tutorial easy to follow, let’s name this project BlogToApp.
Source Code Management
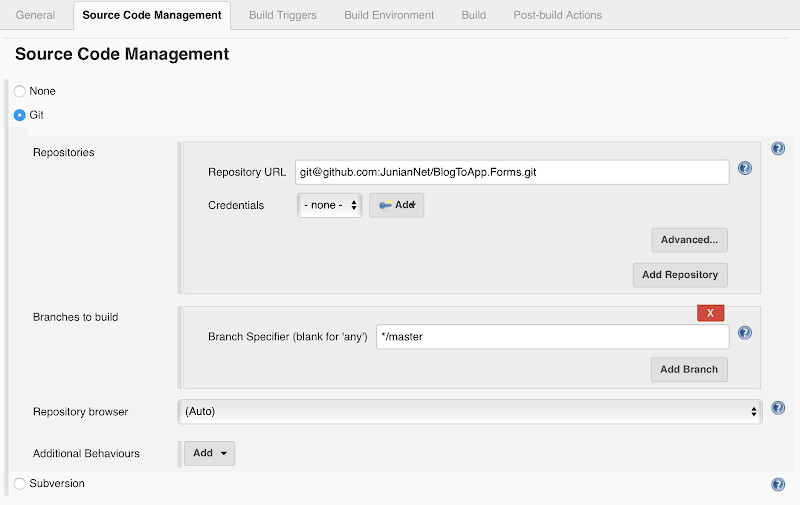
Since we need to create a new build every time a new source code change pushed, we need to setup a source code repo. Since most my projects are on GitHub and Bitbucket, I will straightly choose git. But you can use whatever you prefer.

For this demo, I use my project from git@github.com:JunianNet/BlogToApp.Forms.git. Feel free to fork this repo if you want a quick test.
Build Triggers
Most people usually choose these build triggers:
- Build periodically - for example every hour, every midnight, etc.
- Poll SCM - This trigger will poll source code control on a regular basis. If any changes have been committed to the source code repository, Jenkins will start a new build.

I personally use Poll SCM and set the schedule every five minutes by typing H/5 * * * * inside schedule text box. This means every 5 minutes, jenkins will pull my source code repository. If there is something new, it will build the source code immediately, if not it will sleep until next 5 minutes.
Build Environment
There a lot of environment variables to inject first. It’ll be helpful to simplify your shell script. To do that, check Inject environment variables to the build process. Then under Properties Content you can write environment variables each per line with KEY=VALUE format.

Next, I’ll explain each environment variable I use and what it is used for.
By default, PATH variable will be different from your machine. But we need to access some cli tools installed by Mono. To do that we need to inject /Library/Frameworks/Mono.framework/Versions/Current/Commands to PATH variable.
Next is to set PROJECT_NAME variable. This will be used to simplify our build shell command. I set this variable based on .sln file name.
When building apk file for android project, we need to set its name manually. So I set its name to APK_NAME variable.
We also going to use an Android command line. So we need to set path to your installed android sdk into ANDROID_HOME variable.
Before publishing Android apk file, we need to sign it. To sign an Android apk, we need a keystore file location and its alias. To do that, I set keystore file location to KEYSTORE_FILE variable and its alias to KEYSTORE_ALIAS.
We also need to set three more variables for Android building. INPUT_APK apk is the location where the first time it is generated by Xamarin. SIGNED_APK is location where apk is saved after signed with jarsigner. Finally, FINAL_APK is location where apk is ready to publish after optimized with zipalign command.
To save time, you can copy my complete environment variables I used for this tutorial:
PATH=/Library/Frameworks/Mono.framework/Versions/Current/Commands:$PATH
PROJECT_NAME=BlogToApp
APK_NAME=net.junian.blogtoapp
ANDROID_HOME=/Users/junian/sdk/android-sdk
KEYSTORE_FILE=/Users/junian/Library/Developer/Xamarin/Keystore/net.junian/net.junian.keystore
KEYSTORE_ALIAS=net.junian
INPUT_APK=$WORKSPACE/Droid/bin/Release/${APK_NAME}.apk
SIGNED_APK=$WORKSPACE/Droid/bin/Release/${APK_NAME}-signed.apk
FINAL_APK=$WORKSPACE/Builds/${APK_NAME}.apk
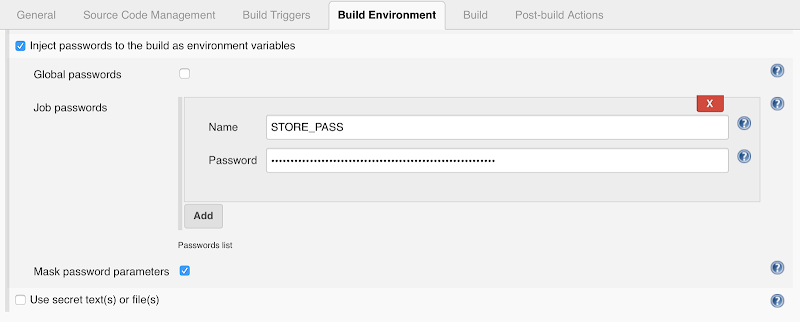
We also need to set STORE_PASS to save our Android signing key passphrase. To do that, check Inject passwords to the build as environment variables, add a new job password, set the name to STORE_PASS, and enter your Android signing key passphrase.

After every variable set, we can continue to configure build steps.
Build Steps
This section is all about build steps performed. In general, here is how it’ll work:
- Restore NuGet packages for each project files
- Build
IPAfile for Xamarin iOS project - Build
APKfile for Xamarin Android project - Sign
APKfile generated from Xamarin Android project
Restore NuGet Packages
Before building iOS or Android version, we need to make sure that all Nuget packages are restored. To do that, we need to add build step with Execute shell option. Use this command to restore all NuGet packages.
nuget restore
Compiling Xamarin.iOS App
Still under Build section, click Add build step, select Execute shell. This time we’ll create IPA file from Xamarin iOS project. For that, all I need to do is to target BlogToApp.iOS project. Please note that by using msbuild command, we can’t use . as project name, instead we can change it with _. Here is the complete command to build iOS project:
msbuild ${PROJECT_NAME}.sln
 /t:${PROJECT_NAME}_iOS
 /p:Configuration="Release"
 /p:BuildIpa=true
 /p:Platform="iPhone"
 /p:IpaPackageDir="$WORKSPACE/Builds"
Compiling Xamarin.Android App
Same with iOS version, add build step, and select Execute Shell option. To build Android target, we need a custom command called SignAndroidPackage. Project target I use is BlogToApp.Droid. Same as iOS version, we need to change . into _.
msbuild ${PROJECT_NAME}.sln
 /t:${PROJECT_NAME}_Droid:SignAndroidPackage
 /p:Configuration="Release"
This apk file isn’t ready for publishing because it’s not signed yet. That means your testers can’t install it on their device. Next step will show you how to sign this file.
Signing Android APK
Click Add build step with Execute Shell option. This step will sign apk file so it’ll be ready to be published. There are two steps performed. First is to sign this apk using a keystore file using jarsigner command. Then it’ll be optimized using zipalign command.
jarsigner -verbose -sigalg MD5withRSA -digestalg SHA1 -keystore $KEYSTORE_FILE -storepass $STORE_PASS -signedjar $SIGNED_APK $INPUT_APK $KEYSTORE_ALIAS
$ANDROID_HOME/build-tools/25.0.3/zipalign -f -v 4 $SIGNED_APK $FINAL_APK
Don’t forget to change 25.0.3 with your own installed version.
Upload to HockeyApp
After you configure all build steps correctly, next step is to upload those files to HockeyApp.
First thing to do, login to your HockeyApp account and head directly to API Tokens. Create a new token, select All Apps, select Full Access or Upload & Release rights, and name it with memorable name, for example jenkins-ci. Click Create to finish API creation.

Now you can see your token under Active API Tokens section. Copy the token to clipboard because we’re going to need it for Jenkins HockeyApp plugin.

Now head back to your jenkins. Click Add post-build action then select Upload to HockeyApp.
Paste your copied token to its place. iOS IPA file is located at Builds/${PROJECT_NAME}.iOS.ipa. Then set Allow Download and Notify Team to whatever you need. I personally activate them both.
You need to add one more section to upload Android file. To do that, just click Add an application …
Same with iOS, paste your API Token to its place. Set Android APK file. It is located at Builds/${APK_NAME}.apk. Set Allow Download and Notify Team to whatever you need it to be.

After all configuration is done, don’t forget to click Save.
To test this configuration, you can just click Build Now and wait for the result.
Summary
With this much automation, we can cut a lot of time doing repetitive boring stuff. After I set this CI and CD, all I need to take care is coding and pushing it to remote server.
There are still a lot of rooms for improvement. For example, we can set build versions automatically for each build. Or do complete Unit Tests after building automatically. Or maybe set API url for each build differently depends on stage of development.
Anyway, hopefully you find this tutorial useful and make your life simpler.
References
- Using Jenkins with Xamarin - Xamarin | Microsoft Docs
- How to upload to HockeyApp from Mac OS X / Client Integration (iOS, Mac OS X & tvOS) / Knowledge Base - HockeyApp Support


